How to Make an Amazon Storefront: Unveiling the Path to Seller Success
In the vast landscape of online retail, standing out from the competition is crucial. Welcome to the world of Amazon storefronts, where sellers have the opportunity to elevate their brand presence and captivate customers like never before.
While many Amazon sellers focus solely on product listings, harnessing the power of a customized storefront can set you apart by providing a dedicated brand destination where customers can confidently engage with your products and learn more about your Amazon business.
This blog will teach you how to create an Amazon storefront, explore this tool's incredible potential, and explain how its intuitive features can enhance customer engagement and elevate your best-selling product or brand's presence in the marketplace.

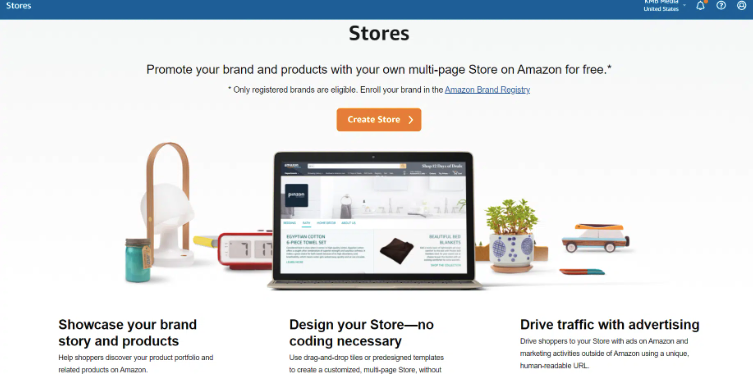
Why do you need an Amazon storefront?
Creating a store on Amazon lets you showcase all of your products in one convenient place, providing your customers with an easier shopping experience. Think of it as an e-commerce microsite nested within the broader Amazon marketplace that's tailored explicitly for your brand.
That being said, an Amazon storefront is more than just a catalog of products. It boosts your "street cred" within the online marketplace, enhances your brand recognition, and fosters customer trust and loyalty. Plus, by personalizing your storefront, you can engage with your customers in a more targeted, one-on-one manner.
Your Storefront Can Foster:
-
A stronger relationship with your existing customers
-
A new stream of first-time buyers
-
A more solid brand position within the highly competitive e-commerce landscape
So what are you waiting for? Let's get started!
How do you create an Amazon storefront?
You're ready to open an Amazon storefront and take your ecommerce business to the next level. First things first; make sure you are part of the Amazon brand registry. Once that step is done, you can leverage Amazon's intuitive storefront design tools to bring your vision to life—no coding experience needed!
Creating an Amazon storefront involves a series of simple yet strategic steps that are designed to optimize your online presence.
This guide will take you through the process of building an Amazon storefront step-by-step.
-
Log into Seller Central: Start by logging into your Amazon Seller Central account. If you don't already have one, you will need to create one to proceed.
-
Navigate to Stores: Once logged into your Amazon seller account, locate the "Stores" option on the main navigation menu, then click on it. A drop-down menu will appear. Select "Manage Stores" from the options presented.
-
Choose Your Homepage and Template: You will then be guided to a page with prompts for selecting your homepage and page template. Follow these prompts carefully and choose an Amazon storefront layout that aligns with your brand aesthetic and the product range you want to offer.
*Alternatively, if you don't want to use the pre-made templates to design your online store, you can opt for a different method! Learn more about this alternative approach below:
-
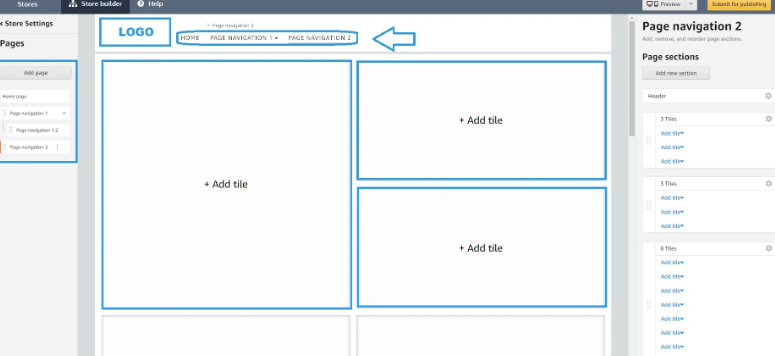
Or, Create Your Own Template: If nothing stands out to you from the list of preset templates, take advantage of Amazon's customizable features to create your unique template. Use the drag-and-drop tiles feature to add pages and design a layout that best represents your brand and enhances your products' visual appeal.
-
Set Your Home Page: After designing your template, make sure to set it as your home page. This will be the first page customers see when they visit your Amazon storefront, so make sure it is engaging and representative of your brand.
-
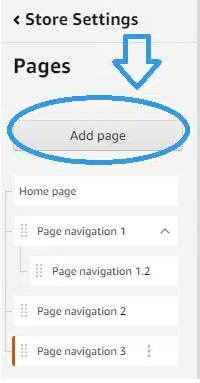
Create New Pages: Now that your home page is set, you can start creating additional pages for your Amazon store. These could be dedicated product pages, about us or brand story pages, contact pages, blog pages, promotion or sales pages, or any other page you deem necessary for your storefront.
Quick Tip—Avoid Clutter

It's important to use multiple pages and tabs effectively. While creating several pages can enhance your store's depth and detail, it's essential to do this strategically. Keep the customer's experience at the forefront of your design decisions.
Avoid creating a cluttered storefront that makes it hard for customers to find relevant information about your products. Strive to make your online store easy to navigate and intuitive to use.
Building Out Your Online Store on Amazon

Now that you've created the "scaffolding" for your Amazon store, it's time to add in your products and take advantage of all the unique ways storefronts let you treat your customers to a great shopping experience.
Product Pages
Depending on your store's layout, you have a lot of options for organizing your products. You can group similar items together on subcategory pages, like a traditional website. If you're selling dog accessories, for example, you could have a separate page for products that make it easier to travel and camp with your dog, another page for collars, a third page for winter essentials, and so on.
Organizing your products and product listings in this way makes it easier for customers to browse your catalog and discover related items they didn't know they needed.
Tiles
You can also group products using Amazon's different tile designs, which can provide customers with an interactive overview of multiple products in your catalog straight from your landing page. Read on for a quick look at a few ways you can use tiles.
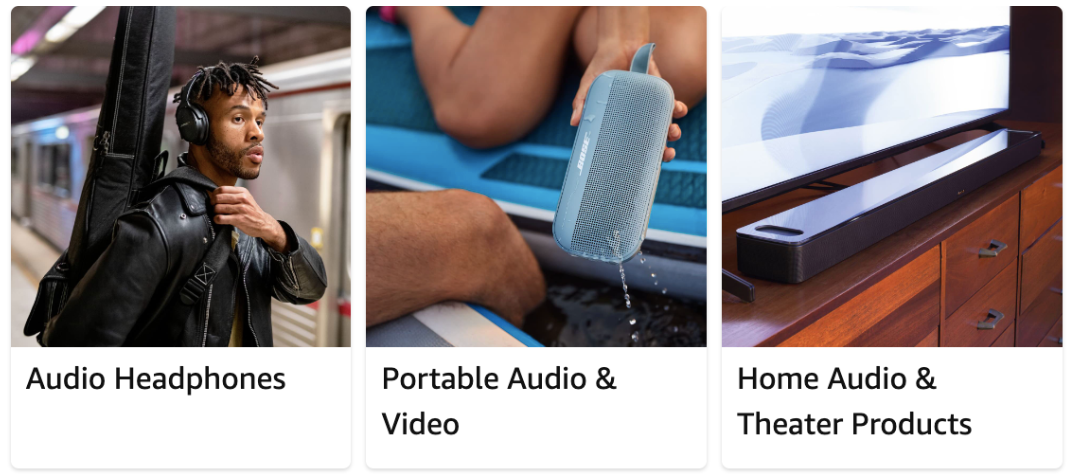
Product Grid Tile
A product gride tile is a dynamic and visual Amazon tool that lets you display a collection of four or more of your products in an easy-to-view grid layout. It acts like a mini catalog within your storefront that showcases key information like product images, pricing, star ratings, and shipping options.
It even includes an "Add to Cart" button for each product listed. The result is a more seamless shopping experience and an easier path to purchase.
Product Collection Tile
As a flexible, curated selection of products, product collection tiles give sellers the opportunity to highlight specific items or thematic groups like seasonal offerings, best sellers, or new arrivals. It's an effective way to guide your customers' focus towards certain products, making it a powerful tool for promotions or to stimulate interest in less-known or newly introduced items.
For each collection, you can add up to 60 products. Simply pick an appealing lifestyle image and a name that will catch shoppers' attention as they scroll through your storefront.
Uploading a Product Collection Tile
-
In the Store Builder tool, create a new section on the page.
-
Locate the product collection tile, and place it where you prefer.
-
Choose a suitable image that works well on both mobile and desktop devices. Include a title and configure any additional settings as needed.
-
Add products by either inputting a list or adding products individually through the search function.
-
Click the "show design options" button to personalize your Amazon store layout.
-
Once everything is set, review the content and submit it for publishing.
Idea Lists
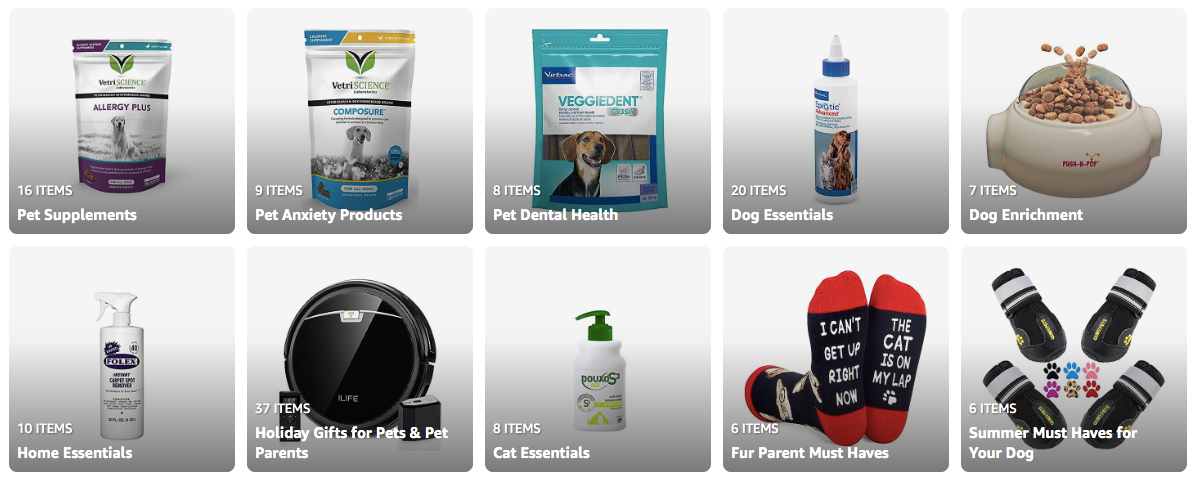
Housing all your products within the same storefront lets you cross-sell and upsell your items by displaying them in an easy-to-browse format, like an idea list. The idea list functions as a board that groups products together according to their category. You could create idea lists to show off your recent releases, your best-selling products, or your ideas for perfect holiday gifts for pet owners, like The Friendly Vet has opted to do above. Shoppers can click on the thumbnail image of the product that interests them and can add it to their carts directly or navigate to the relevant detail page on Amazon to read more.
Ready to create your own idea list? Here's how:
Uploading Idea Lists
-
From your account, scroll down and click "Your Lists."
-
Go to "Your Idea Lists" at the top of the screen.
-
Select "Create an Idea List."
-
Provide a name and description, then select "Post."
-
Add products to your list that relate to the category.
Shoppable Photos
A shoppable photo is an interactive image that features up to 15 different products in context. Customers can directly click on specific parts of the photo to explore and purchase the product shown within the image. When selecting an image, choose high-quality lifestyle photos that show the product(s) in a realistic, but not too visually busy setting.

For example, if you sell outdoor furniture and patio accessories, start with a photo of a beautiful backyard. Your best-selling patio set is featured front and center as the hero image, along with your end tables, coffee tables, sun shade, and outdoor rug.
Indicate which products are linked and available for purchase by placing a black-and-white clickable circle near the item in question. Make sure it's near the product but still easily visible. If you place the circle right over a dark-colored product, there might not be enough contrast for the shopper to see it.
Uploading Shoppable Photos
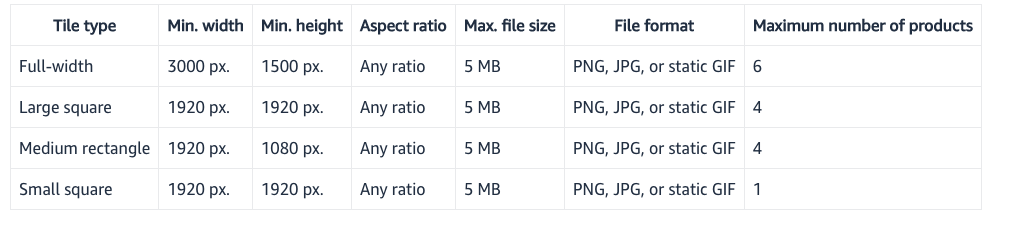
When adding a shoppable photo, you can choose whether you want it to appear as a full-width, large square, medium rectangle, or small square tile. The specific size guidelines for each option are listed below.
Once you've decided on the image's design, tile slot, and size, you're ready to upload your shoppable photo!
Below, we've listed each step in the process:
-
Navigate to the Store Builder: Once you've selected your store, click on the "Edit Store" button. This will take you to the Store Builder Main Menu, which is where you can manage and customize your storefront's pages.
-
Select the page to edit: Choose the page where you want to add the shoppable image, then click on the 'Edit' button.
-
Add Image with Text Tile: In the editing mode, select 'Add Tile' and choose the 'Image with Text' tile from the drop-down menu.
-
Upload your image: Click on the tile to select it, and then click on the "Upload Image" button that appears on the right side of the screen. Upload the image you want to make shoppable from your computer or select an existing image from your library.
-
Add products to your image: Once your image is uploaded, click on the "Tag Products" button. This will allow you to add product tags to your image. Search for the product by its name or ASIN and add it to your image.
-
Place product tags: Move the product tags, or clickable circles, to the specific products in your image. This step makes those parts of your image shoppable.
-
Save and Submit: After you've finished placing all your product tags, save your changes and submit your page for review. Amazon usually reviews and approves within 24 hours.
Shoppable Live Stream and Videos
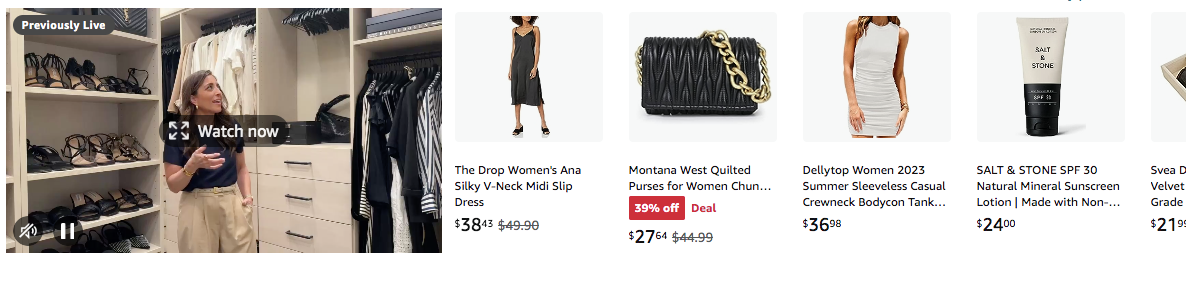
A shoppable livestream video on an Amazon storefront offers a real-time interactive experience where hosts showcase products while viewers can instantly purchase them without leaving the live stream.
This format enhances customer trust and engagement through live discussions, product demonstrations, and Q&A sessions. The visual appeal of video enhances product visibility, leading to increased impulse buying and sales conversion rates.
Additionally, live streams help potential buyers discover your product, enable personalized recommendations, and provide valuable engagement metrics for future marketing strategies. The convenience of seamless purchasing, combined with storytelling and social sharing, creates an immersive and efficient shopping experience, ultimately connecting brands and products with customers in a dynamic and impactful way.
Uploading a Shoppable Live Stream:
-
Amazon Live Creator: Access the Amazon Live Creator dashboard through your professional seller account.
-
Create a Live Stream Event:
-
Set up a new livestream event by providing details such as title, description, and intended date and time.
-
Choose the products you plan to showcase in your live stream. These will be the "shoppable" products that viewers can purchase directly from the live stream.
-
-
Preparation:
-
Plan your live stream content, including demonstrations, discussions, and any interactive elements you want to include.
-
Make sure you have the necessary equipment for a high-quality live stream, such as a camera, microphone, and lighting.
-
-
Go Live:
-
At the scheduled time, start your live stream through the Amazon Live Creator dashboard.
-
Engage with viewers by showcasing products, answering questions, and providing valuable information.
-
-
Shoppable Elements:
-
As you showcase products, viewers will see shoppable overlays on the video. These overlays will allow them to click on the products for more information and to make purchases.
-
-
Viewer Engagement:
-
Encourage viewers to interact with the live stream by asking questions, providing feedback, and clicking on shoppable products.
-
-
End the Livestream:
-
Once your live stream is complete, end the broadcast through the Amazon Live Creator dashboard. Include links to your past live streams on your storefront.
-
Brand Story
If you already have a Brand Story that appears on your product detail pages, you can incorporate it into your store on Amazon! If you're ready to share your brand story for the first time, you can dedicate a section of your Amazon storefront to this message as well.
A well-crafted story can evoke emotions and resonate with customers on a personal level. It helps humanize your brand, making it easier for customers to connect with your products or services. Customers appreciate transparency and are more likely to support brands they perceive as authentic. Below, we've included an example of a part of a brand story landing page that demonstrates these principles well:

Uploading a Brand Story Page to Your Amazon Storefront:
-
Create a New Page:
-
Within the Storefront Builder, you can edit and manage the pages of your Amazon storefront. Create a new page where you want to feature your story, as shown in the example below.

-
-
Add Content:
-
Depending on the design and layout of your storefront, you can add text, images, videos, and other content to tell your brand story.
-
Craft a compelling narrative that highlights your brand's values, mission, history, and unique qualities.
-
Use visuals that resonate with your brand and convey the essence of your story.
Submitting Your Storefront for Approval
Preview your store to check for errors before going live. As part of your final round of proofreading, make sure your images meet Amazon’s storefront guidelines. Also, ensure that your copy is engaging, error-free, and smoothly incorporates high-ranking keywords. SEO-optimized copy will boost your rank on Google and other search engines and help direct organic external traffic to your Amazon store.
Once you're confident your storefront is ready, submit it to Amazon for review and approval.
Remember—your Amazon storefront is a direct reflection of your brand, so take your time to create an appealing, user-friendly interface that enhances customer experience and optimizes your product visibility.
Outro
Ready to take your Amazon selling journey to the next level with a captivating storefront? Start creating your Amazon storefront today and unlock the power of customization, enhanced navigation, data-driven insights, and promotional tools.
Don't miss out on the opportunity to build a strong brand presence, engage customers, and drive sales. Explore the endless possibilities of an Amazon storefront and set yourself up for success. Begin your journey now and let your storefront be a reflection of your brand's excellence on Amazon!

Leave a comment
Please note, comments must be approved before they are published